

Create & manage Plan Groups & Selling Plans
Plan Groups define the subscription options available for selected products in Yari Flow.
Each Plan Group can contain one or more Selling Plans. A Selling Plan is an individual subscription option, such as:
- Every week with 20% off
- Every two weeks with 10% off
- Every month with no discount
A Plan Group also controls which products are included and which delivery frequencies customers can choose when managing their subscription through My Account.
What is the difference between a Plan Group and a Selling Plan?
A Plan Group is the main container that connects:
- One or more Selling Plans
- Selected products or product variants
- Available frequency options
- Customer visibility settings
A Selling Plan is one subscription option inside the Plan Group. It defines:
- The customer-facing name
- The billing and delivery frequency
- The pricing policy
- The discount value
- Any recurring discount configuration
For example, a Plan Group called Protein subscriptions could contain:
- Every week with 15% off
- Every two weeks with 10% off
- Every month with 5% off
Open the Plan Groups page
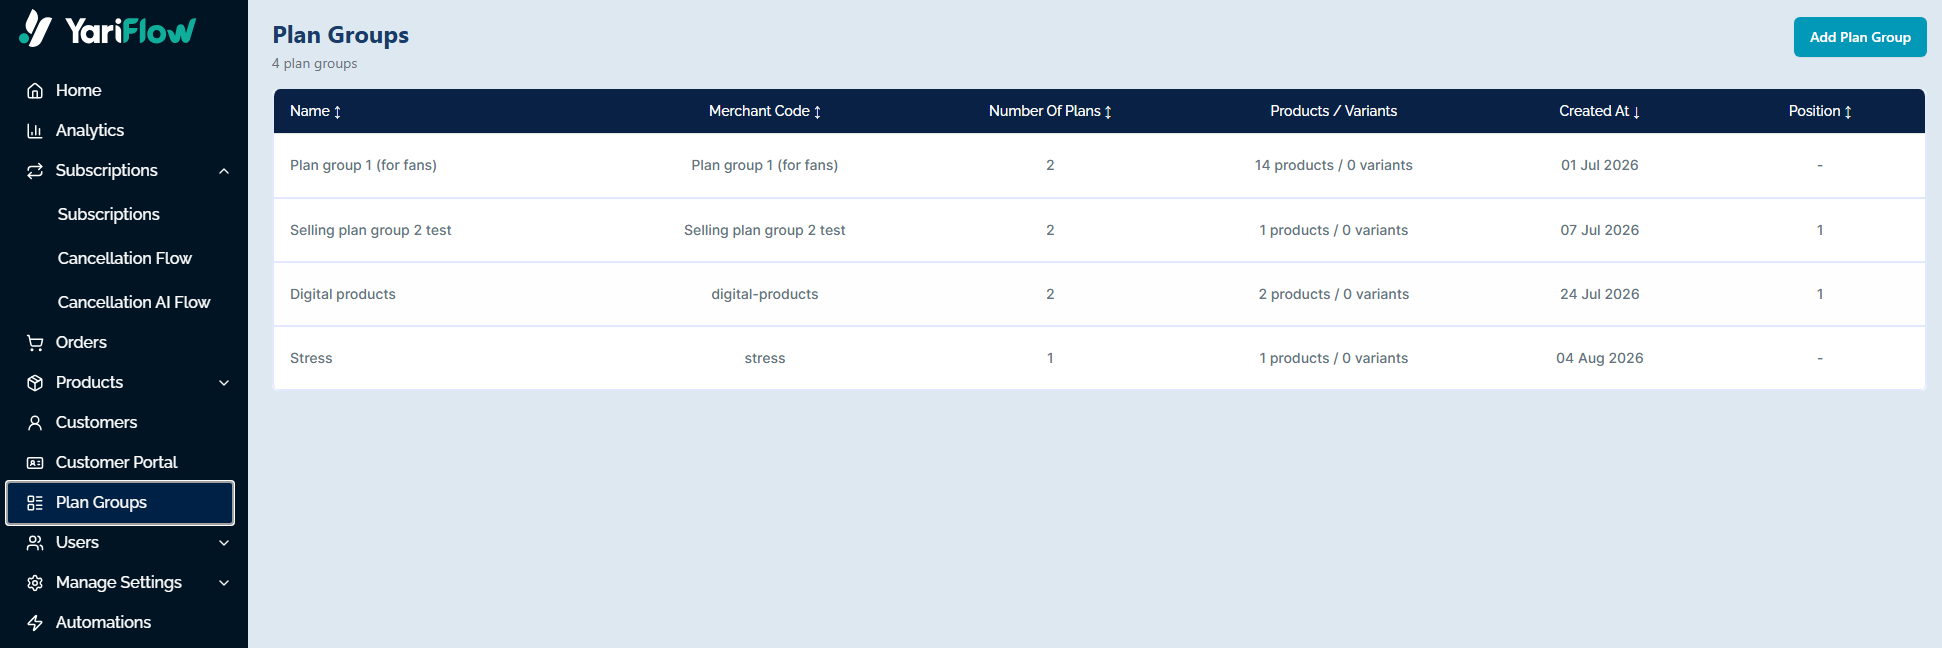
1. In the left-hand menu of the Yari Flow Dashboard, select Plan Groups.
2. Review the existing Plan Groups or select Add Plan Group to create one.
The Plan Groups table includes:
- Name: The name of the Plan Group
- Merchant Code: The code associated with the group
- Number of Plans: The number of Selling Plans inside the group
- Products / Variants: The number of products and individual variants included
- Created At: The date the Plan Group was created
- Position: The group’s configured position
You can sort selected columns using the arrows beside the column headings.
Create a Plan Group
To create a new Plan Group:
1. Go to Plan Groups.
2. Select Add Plan Group.
3. Enter the required Plan Group details.
4. Configure the available customer frequencies.
5. Add one or more Selling Plans.
6. Select the products or collections that should use the Plan Group.
7. Review the customer visibility settings.
8. Select Save.
Configure the Plan Group details
Each Plan Group have a specific details, :
Name
Enter a clear name that helps your team identify the Plan Group.
For example:
- Weekly supplement subscriptions
- Digital product subscriptions
- Coffee delivery plans
Merchant Code
The Merchant Code identifies the Plan Group within the merchant’s account.
Use a clear and consistent format that your team can recognise.
It must be unique and can be edited at any time.
Description
Use the Description field to provide additional information about the Plan Group.
Number of Plans
The number of plans show the number of selling plans in the Plan group.
Product / Variants
Shows the number of Products and product variants in the Plan group.
Position
Use Position to define the Plan Group’s order where position-based ordering is supported.
Configure the available customer frequencies
The Available frequencies for group section defines the delivery schedule options customers can choose when changing their subscription through the My Account.
Frequencies can be configured using:
- Days
- Weeks
- Months
- Years
For example:
- 2 under Days means every two days
- 2 under Weeks means every two weeks
- 3 under Months means every three months
These options do not necessarily create new Selling Plans. They define the schedule changes available to existing subscribers in the My Account.
Select only the frequencies you want customers to be able to choose.
Add a Selling Plan
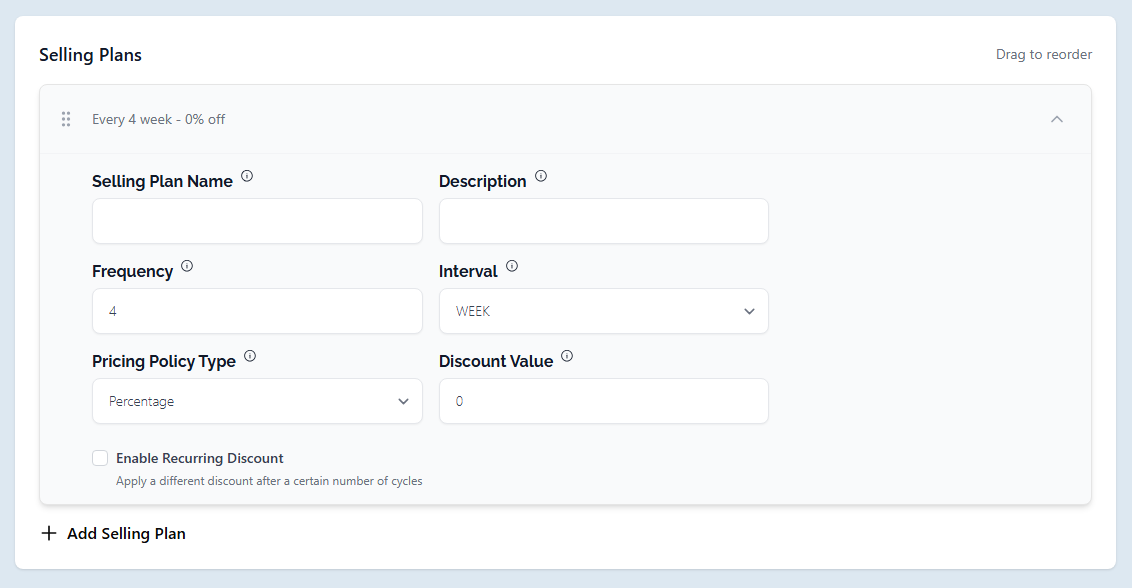
Each Selling Plan represents one subscription option customers can select.
To add one:
1. Find the Selling Plans section.
2. Select Add Selling Plan.
3. Enter the Selling Plan name and description.
4. Configure the frequency and interval.
5. Select the pricing policy type.
6. Enter the discount value, where applicable.
7. Configure a recurring discount if required.
8. Save the Plan Group.
You can add multiple Selling Plans to the same Plan Group.
Configure a Selling Plan
Selling Plan Name
Enter the name customers will use to understand the subscription option.
Use clear names such as:
- Every week
- Every two weeks
- Every month
Avoid internal labels or unclear abbreviations.
Description
Use the Description field to explain the subscription option or its benefit.
For example: Save 10% when you receive this product every two weeks.
Keep the description short and make sure it accurately reflects the configured schedule and discount.
Frequency and Interval
The Frequency and Interval fields work together to define the subscription schedule.
- Frequency is the number.
- Interval is the unit of time.
For example:
A frequency of 2 with the interval WEEK does not mean two deliveries per week. It means one delivery every two weeks.
Pricing Policy Type
Select how the subscription price should be calculated.
Yari Flow supports three pricing policy types:
After selecting the Pricing Policy Type, enter the relevant amount in Discount Value or Flat Value. For example:
- Percentage = 10 means 10% off
- Fixed Amount = 5 means £5 off
- Flat Price = 12 means the subscription price is £12
Make sure the Selling Plan name and description accurately reflect the configured pricing.
Discount Value
Enter the value that should apply based on the selected Pricing Policy Type.
For example, when the Pricing Policy Type is Percentage, entering 10 applies a 10% discount.
Make sure the value matches the description shown to customers.
Configure recurring pricing
Enable Recurring Discount when the subscription pricing should change after a specified number of billing cycles.
Despite the setting name, the new pricing can be configured as a percentage discount, a fixed discount or a flat price.
This can be useful for:
- Introductory subscription offers
- Trial pricing
- Discounts that expire after a set number of orders
- Loyalty pricing that begins after several subscription cycles
To configure recurring pricing:
1. Enable Recurring Discount.
2. Enter the number of cycles in Apply After Cycles.
3. Select a Recurring Discount Type.
4. Enter the new value in Recurring Discount Amount.
5. Save the Plan Group.
Apply After Cycles
Use Apply After Cycles to define how many subscription cycles use the initial pricing before the recurring pricing takes effect.
For example, entering 2 means the initial pricing applies for two cycles before the recurring pricing is applied.
Recurring Discount Type
Select how the price should be calculated after the specified number of cycles.
The available options are:
Recurring Discount Amount
Enter the value associated with the selected Recurring Discount Type.
For example:
- Percentage = 10 applies a 10% discount
- Fixed Amount = 5 deducts £5
- Flat Price = sets the subscription price to £12
A value of 0 with Percentage means that no percentage discount is applied after the selected number of cycles.
For example, a Selling Plan could use:
- An initial Flat Price of £10
- Apply After Cycles: 2
- Recurring Discount Type: Percentage
- Recurring Discount Amount: 0
In this example, the subscription would use the £10 flat price for the initial cycles, then return to the full Shopify product price when the recurring pricing begins.
Reorder Selling Plans
You can change the order of the Selling Plans within a Plan Group.
1. Open the Plan Group in edit mode.
2. Find the Selling Plans section.
3. Use the drag handle beside a Selling Plan.
4. Move it to the required position.
5. Select Save.
Remove a Selling Plan
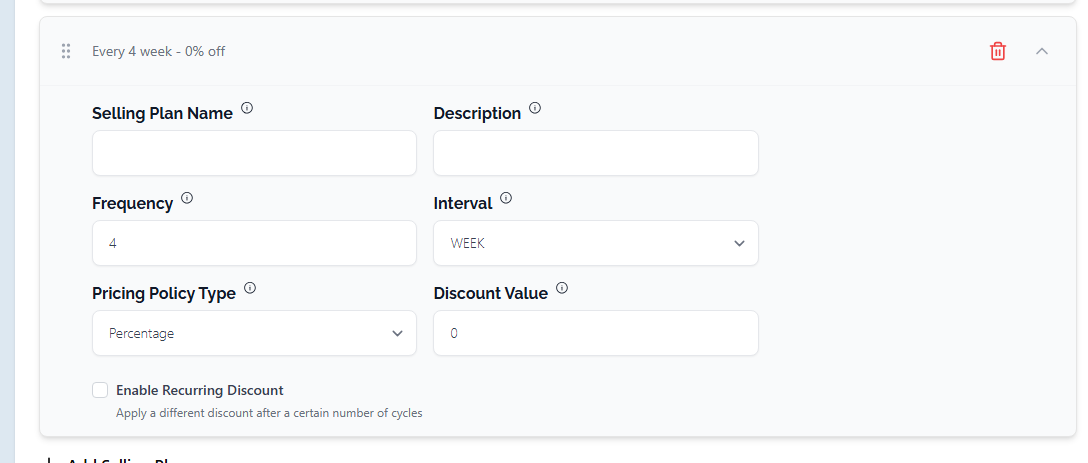
To remove a Selling Plan:
1. Open the Plan Group in edit mode.
2. Find the Selling Plan you want to remove.
3. Select the bin icon.
4. Review the change.
5. Select Save.
Select products
The Product Selection section controls which products are connected to the Plan Group.
You can add products in two ways:
- Select Products: Choose individual products.
- Select Collections: Select products using Shopify collections.
Use the search field to find products already included in the group.
Select product variants
A selected product may include:
- All variants
- Specific variants only
Where available, expand the product to review or change the selected variants.
The Plan Groups list shows separate totals for products and individually selected variants.
Control product visibility in My Account
Each selected product includes a Visible on Account option.
Use this setting to control whether the product is available or displayed to customers in My Account. This determines which products can be added to or swapped within a subscription.
Remove a product from the Plan Group
To remove a product:
1. Open the Plan Group in edit mode.
2. Find the product under Product Selection.
3. Select the bin icon.
4. Select Save.
Save and sync a Plan Group
Select Save after creating or editing the Plan Group.
The Plan Group detail page also includes a Sync action.
Delete a Plan Group
To delete a Plan Group:
1. Open the Plan Group.
2. Select Delete.
3. Review the warning or confirmation message.
4. Confirm the deletion.
Deleting a Plan Group may affect the subscription options associated with its products.
Frequently asked questions
Can a Plan Group contain more than one Selling Plan?
Yes. A Plan Group can contain multiple Selling Plans with different frequencies and discounts.
For example:
- Every week with 20% off
- Every two weeks with 10% off
Can Selling Plans have different discounts?
Yes. Each Selling Plan can have its own Pricing Policy Type and Discount Value.
What is the difference between a Selling Plan frequency and an available group frequency?
A Selling Plan frequency defines an option customers can initially subscribe to.
The available group frequencies define the schedule options customers can choose later when managing their subscription through My Account.
Can customers change their subscription frequency?
Customers can choose from the frequencies configured under Available frequencies for group when changing their delivery schedule through the My Account.
The exact actions available also depend on the My Account configuration.

